Playwright testing with GitHub Actions: the missing pieces for scalable CI
Last time, we got our Playwright pipeline to run on its own. Now it’s time to make it scalable — turning repeated steps into modular building blocks you can reuse across multiple workflows.

In the previous article, we took our basic Playwright workflow and made it a bit smarter — automatic triggers, Slack updates for visibility, and parallel jobs to cut the waiting time.
It’s no longer a manual test runner — it’s a self-running, self-reporting CI pipeline that keeps everyone in the loop.
If you missed it, here it is: Playwright testing with GitHub Actions: from manual runs to automated.
But if your repository has more than one workflow — say, different test suites — things can quickly get messy. Copying and pasting the same logic between files works… until you need to change something in all of them.
In this article, we’ll turn our current setup into building blocks you can call from multiple workflows in the same repo — clean, consistent, and easy to maintain.
Composite action
If you look at the workflows from the previous articles, you’ll notice that the setup is almost identical across all of them:
steps:
  - name: Checkout code
    uses: actions/checkout@v4

  - name: Set up Node.js
    uses: actions/setup-node@v4
    with:
      node-version: ‘22’
      cache: ‘yarn’

  - name: Install dependencies
    run: yarn install

  - name: Install Playwright browsers
    run: yarn playwright install chromium
There’s a slight difference in the Node version defined in the default Playwright workflow. To ensure the project works consistently across all setups and guarantees the same results, the versions of the used technologies should be defined and locked in the package.json file as well as in the workflows.
To standardize the setup across workflows and make it reusable, there are two approaches: composite actions and reusable workflows.
For this case, a composite action is the right choice.
How does composite action work?
Composite actions run as steps within the same job and on the same runner, inheriting the calling job’s context, which includes access to checked-out files, environment variables, and the workspace state. Because they reuse the same environment, they execute faster than reusable workflows, which start fresh runners for each job.
They’re ideal for grouping small, repeatable tasks — standardizing setup steps, sharing configurations without duplication, and securely passing tokens or secrets through inputs or environment variables.
To create an action, add a folder named actions inside .github, then another one for your action’s name, and place an action.yaml file inside it — like this:.github/actions/setup-playwright/action.yaml, and define your action:
name: ‘Setup Playwright’
description: ‘Install Node.js, dependencies and Playwright browsers’

runs:
  using: ‘composite’
  steps:
    - name: Set up Node.js
      uses: actions/setup-node@v4
      with:
        node-version: ‘22’
        cache: ‘yarn’

    - name: Install dependencies
      run: yarn install
      shell: bash

    - name: Install Playwright browsers
      run: yarn playwright install chromium
shell: bashYou can notice an explicit reference to the bash shell. This is a characteristic of GitHub Actions architecture: composite actions require an explicit shell specification, whereas regular jobs inherit the shell from the runner.
Now, to use it in the workflow, replace the part with those steps in the workflow with a connector, like this:
- name: Set up Node.js and Playwright
  uses: ./.github/actions/setup-playwright
GitHub Actions automatically searches for a file named action.yaml in the specified directory, so there is no need for the full path to the file.
Composite actions help keep your GitHub workflows clean and consistent by removing duplication and centralizing setup logic. This makes workflows easier to read and understand by turning complex setup logic into one clear, descriptive step.
And, instead of copying the same steps across multiple workflows, you define them once and reuse them wherever needed. Any change to the environment setup, dependencies, or tool versions happens in a single place, which reduces the risk of configuration drift.
Reusable workflow
The following two steps in the workflow are simple and unique enough that they don’t need to be reused. Notifications, however, are a different story. If we want to have multiple workflows for different test runs, we should notify dedicated channels about each one's start and completion.
In this case, a reusable workflow would work better.
How does reusable workflow work?
Reusable workflows in GitHub Actions act like shared pipelines that can be called from other workflows. Each time they’re invoked, they run as separate jobs on new runners, with their own environment and context, and do not have access to the environment that calls them.
This isolation makes them perfect for larger, independent processes — such as running test suites, deploying code, or publishing artifacts — where clean execution and clear job boundaries matter. They accept inputs, outputs, and secrets, allowing you to parameterize behavior and share consistent logic across multiple workflows while keeping the main ones simple and easy to maintain.
So, we’re creating a new workflow file. The first step to make a workflow reusable is to set the correct trigger, which looks like this:
on:
  workflow_call:
This basically tells that this workflow can be called by some other workflow in your repo, or even from another repo.
You can also set here the inputs and secrets the reusable workflow requires to work with, or outputs it should return to the calling workflow, like this:
on:
  workflow_call:
    inputs:
      environment:
        required: true
        type: string
    secrets:
      token:
        required: true
    outputs:
        deployment-url: ${{ jobs.deploy.outputs.url }}
You can find more details about supported parameters in the official documentation.
If you take a closer look at both Slack jobs, they do almost the same thing — they run on the same runner, use the same secret, and send a message with the same curl command. The only difference is in how they run and the message they send — one at the start, another after the test job finishes. It’s a perfect candidate for unification through parameterization — extracting the common logic into a reusable workflow and passing the workflow status as an input. In this case, here’s how the trigger will look:
on:
  workflow_call:
    inputs:
      job_status:
        description: ‘Status: started, success, failure, cancelled, skipped’
        required: true
        type: string
    secrets:
      SLACK_WEBHOOK_URL:
        required: true
Last but not least, we need to define the job that sends the message. Nothing unexpected here — we’ll reuse the same parts from the previous workflow. The only change is the message itself, which will vary depending on the job status; a simple case operator will handle that. And one slight improvement we can make to the notifier is to include the name of the pipeline it’s reporting on.
So the job is going to look like this:
jobs:
  send-notification:
    runs-on: ubuntu-latest
    steps:
      - name: Post message to Slack
        env:
          SLACK_WEBHOOK_URL: ${{ secrets.SLACK_WEBHOOK_URL }}
        run: |
          PIPELINE_NAME=”${{ github.workflow }}”

          case “${{ inputs.job_status }}” in
            “started”)  MESSAGE=”🚀 $PIPELINE_NAME started” ;;
            “success”)  MESSAGE=”✅ $PIPELINE_NAME succeeded” ;;
            “failure”)  MESSAGE=”❌ $PIPELINE_NAME failed” ;;
            “cancelled”) MESSAGE=”🚫 $PIPELINE_NAME was cancelled” ;;
            “skipped”)  MESSAGE=”⏭️ $PIPELINE_NAME was skipped” ;;
            *)          MESSAGE=”⚠️ $PIPELINE_NAME - status: ${{ inputs.job_status }}” ;;
          esac

          curl -X POST -H ‘Content-type: application/json’ \
          --data “{\”text\”:\”$MESSAGE\”}” \
$SLACK_WEBHOOK_URLNow, let’s connect it to the workflow from which it would be called, which would look like this:
  post-slack-notification-started:
    uses: ./.github/workflows/slack-notification.yaml
    with:
      job_status: started
    secrets:
      SLACK_WEBHOOK_URL: ${{ secrets.SLACK_WEBHOOK_URL }}

  post-slack-notification-results:
    needs: run-simple-suite
    if: always()
    uses: ./.github/workflows/slack-notification.yaml
    with:
      job_status: ${{ needs.run-simple-suite.result }}
    secrets:
      SLACK_WEBHOOK_URL: ${{ secrets.SLACK_WEBHOOK_URL }}
Note: there is no such started status for a workflow, so a string needs to be passed in this case.
Final workflow
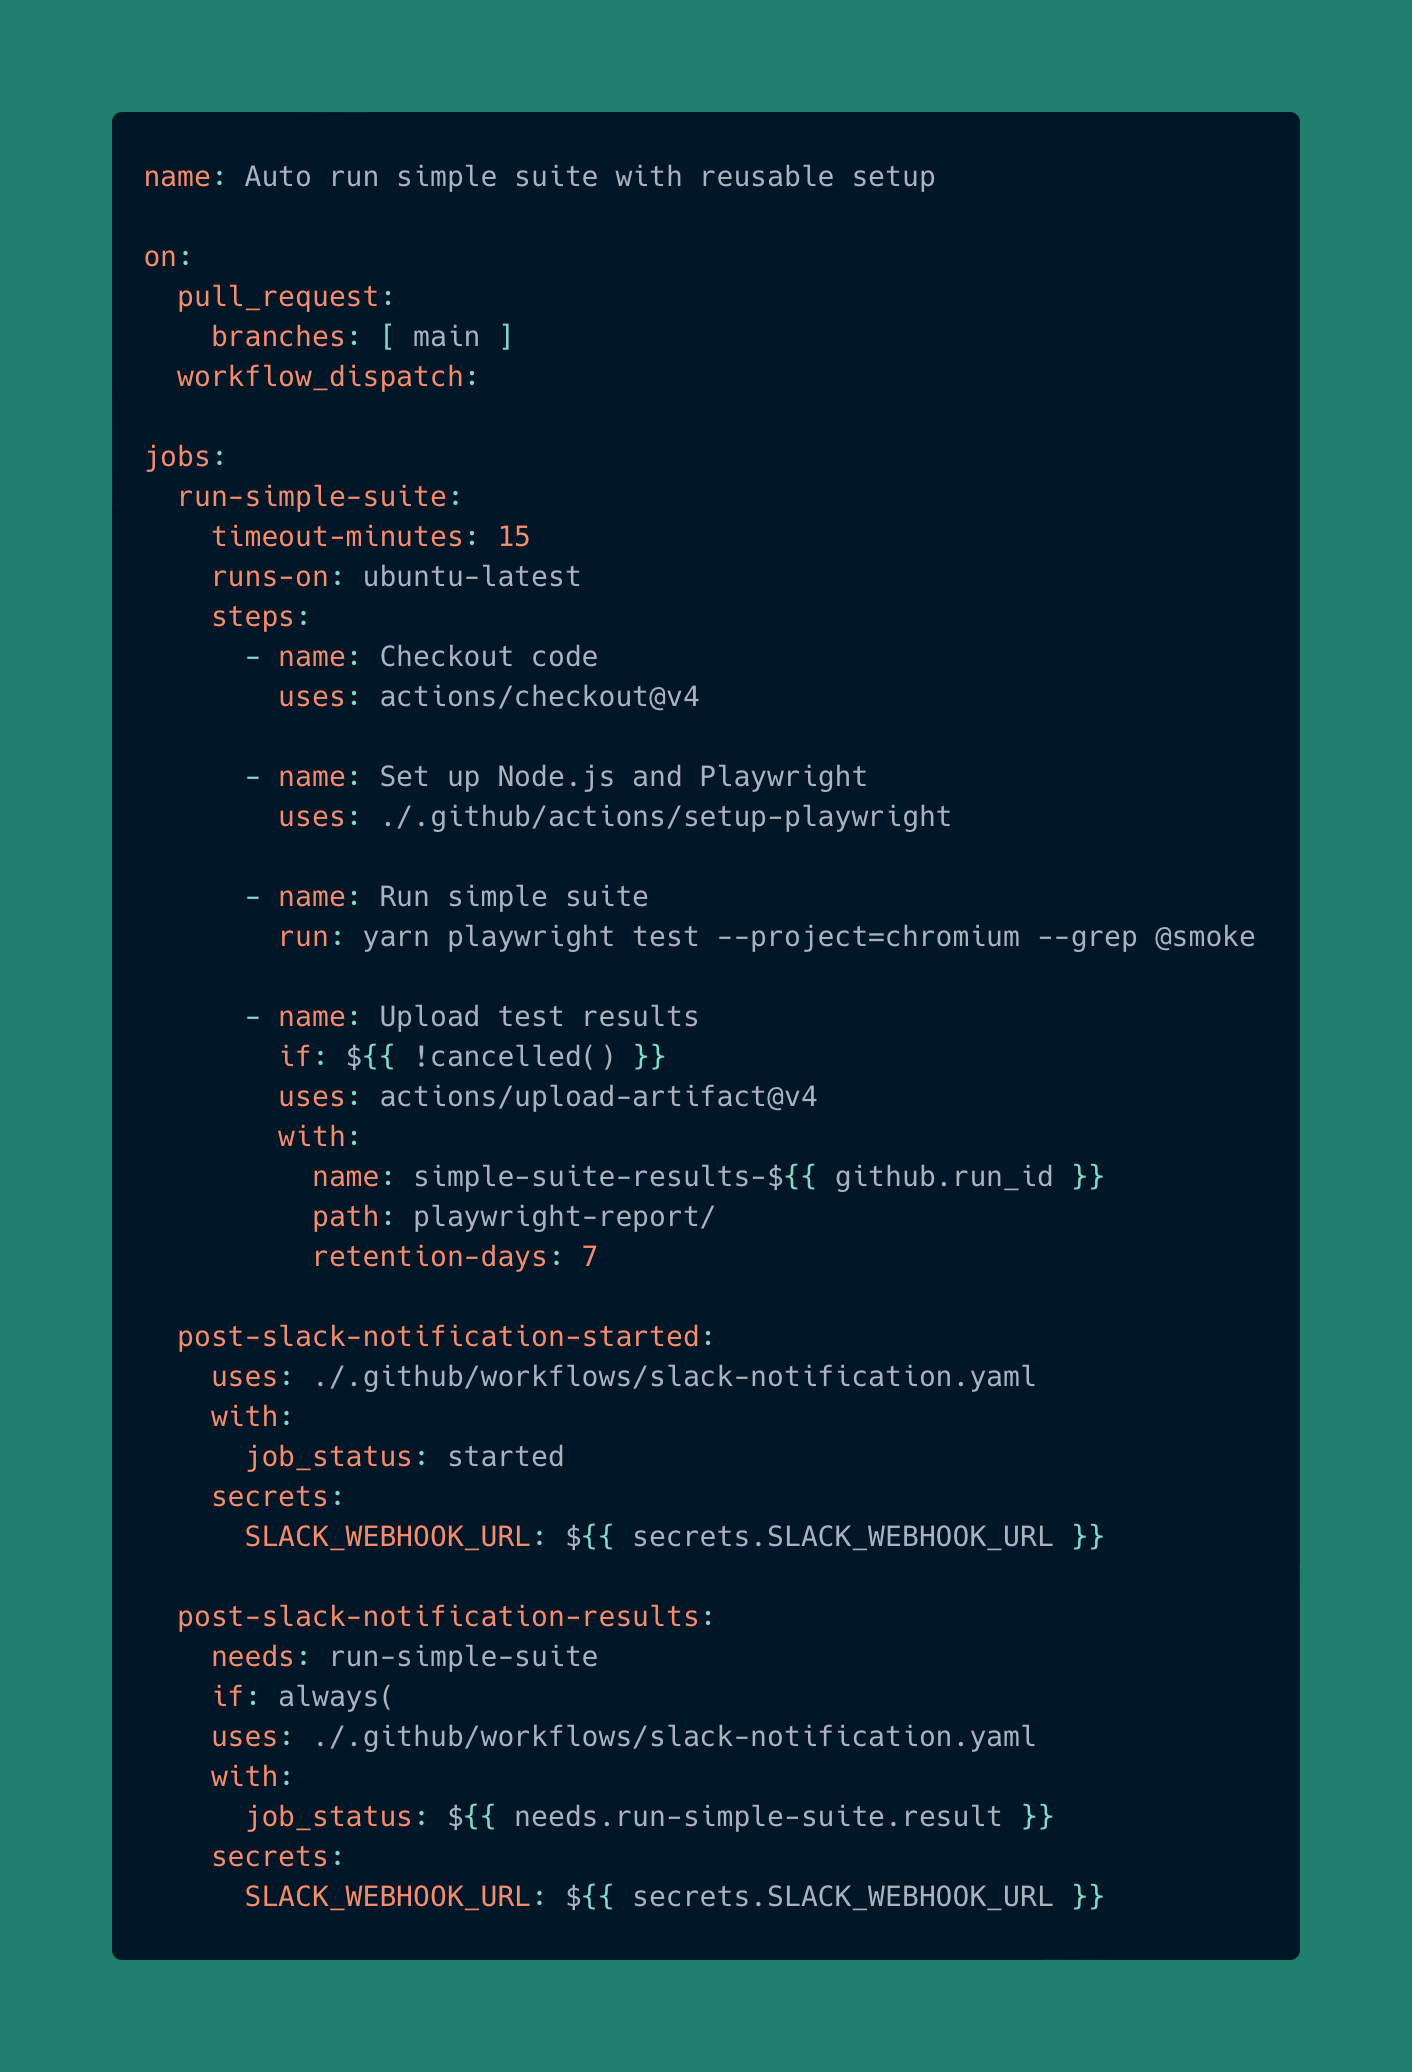
This way, you can connect the reusable workflow to any calling workflow and get consistent messaging across all your pipelines — no code duplication, less maintenance, and full scalability. You can post to any Slack channel that has a webhook, use it with any pipeline, and easily extend the message cases to cover more scenarios as needed.
Recap
We’ve built a more modular and maintainable CI structure with:
A composite action that centralizes all the setup logic once shared across workflows.
A reusable workflow that handles Slack notifications and takes the job status as an input.
The result is a shorter, more readable pipeline where each job focuses only on what it needs to do — running tests or sending notifications — while the shared logic lives in one place. Updating dependencies, tool versions, or message formats no longer means editing multiple files, making the whole setup more consistent, scalable, and reliable.
When to choose what:
Use a composite action for steps that must run in the same job or runner (accessing repo files or environment).
Use a reusable workflow for independent jobs (notifications, deployments, publishing) that don’t need the caller's context.
In the next article, we’ll explore how to use multiple pipelines as part of a bigger testing strategy — orchestrating them in a way that keeps feedback fast and quality under control.